Getting Started: First Launch and UI Tour
This guide takes you from a fresh install to knowing your way around the SEAM Studio window: the toolbar, the five mode tabs, the scene tree, the inspector, and the dockable panels. No GPU, no Sionna, no LLM required — everything here works with the built-in Mock backend. For the full installation reference see INSTALL.md.
1. Install and launch
There are two ways to run SEAM Studio. Pick one.
Route A — pip install (the packaged app)
pip install seam-studio
seam-studio
The seam-studio command starts the server on http://127.0.0.1:8000 and opens your browser. On first run it bootstraps the Sample Demo project into ~/.seam/projects, so the app never starts empty. Useful flags: --port 9000, --project-root D:\twins, --no-browser.
Route B — source checkout (dev servers)
Clone the repo, run the install script once (INSTALL.md walks through it), then start both servers:
# Windows
powershell -ExecutionPolicy Bypass -File scripts\start.ps1
# Linux/macOS
bash scripts/start.sh
This runs the backend on :8000 and the Vite dev frontend on http://localhost:5173 — open the :5173 address. The rest of this guide assumes the dev URL, but the packaged app looks identical.
2. The toolbar
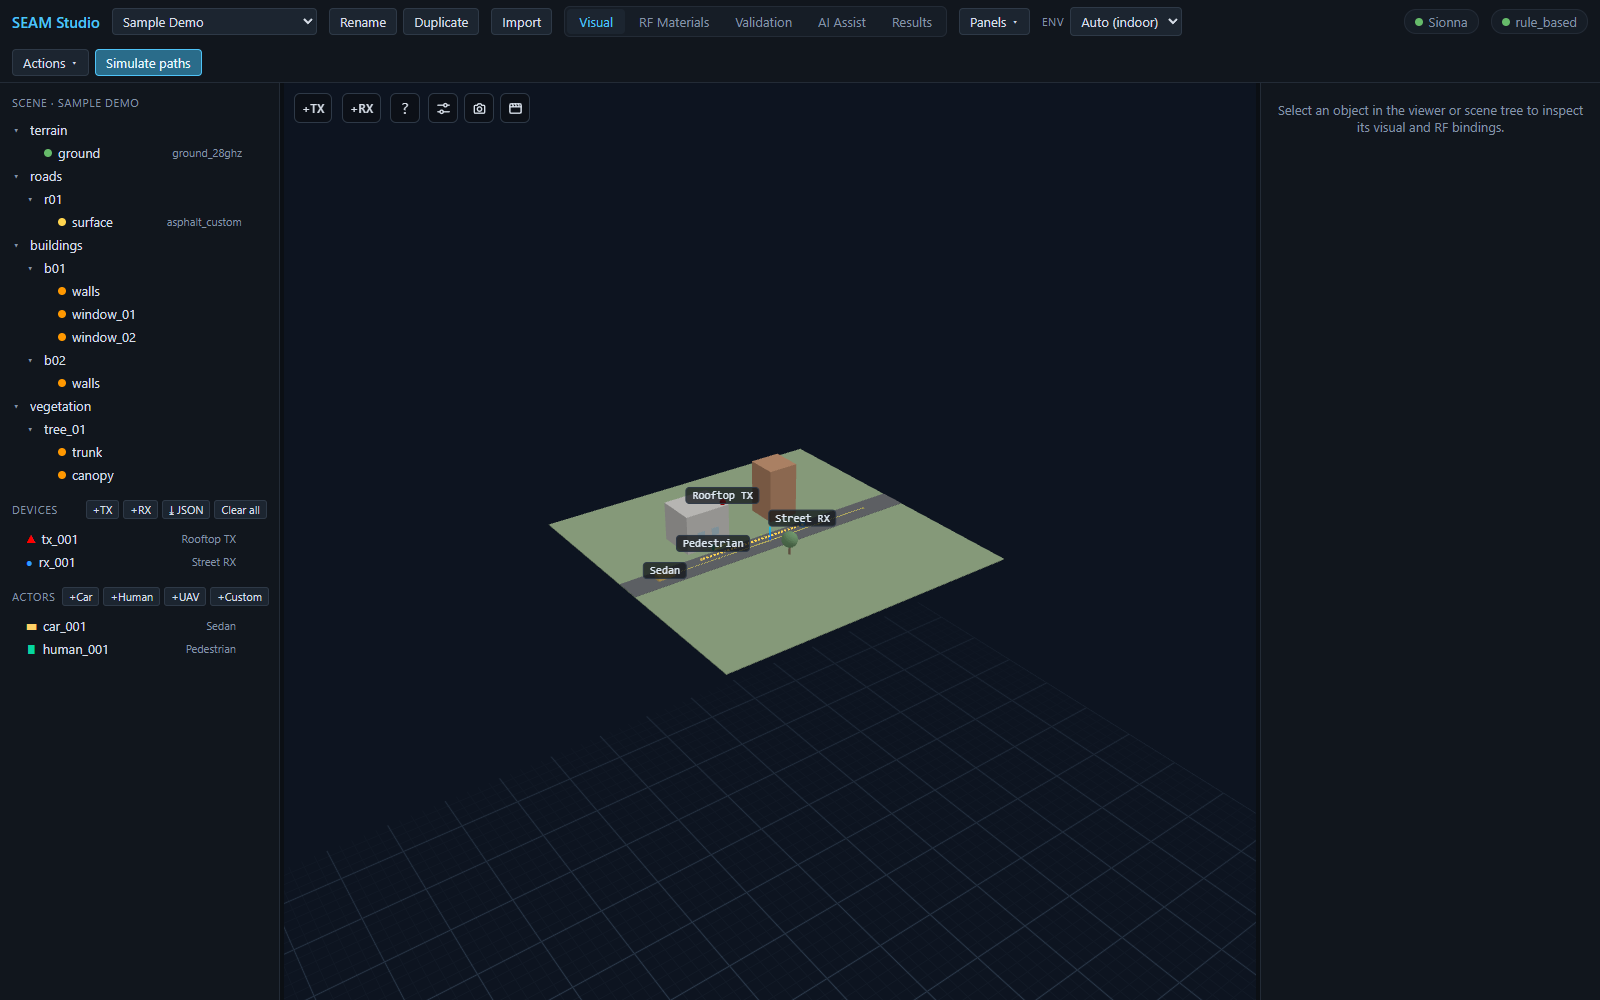
tx_001 / rx_001, actors car_001 / human_001, and the toolbar.From left to right, the top toolbar shows:
- The SEAM Studio title and the project select. The Sample Demo project loads automatically; switch projects here.
- Rename and Duplicate — rename the current project's display name inline (Enter to save, Esc to cancel) or deep-copy the whole project folder and open the copy.
- Import — bring in a new scene as a new project, either a Mitsuba XML file (or a .zip bundle with meshes and textures) or an OpenStreetMap rectangle fetched by coordinate.
- The five mode tabs:
Tab What it does Visual 3D scene navigation, picking, scene tree, inspector. RF Materials Color overlay per RF material; assign from a dropdown. Validation Scene validation warnings (unassigned materials, etc.). AI Assist AI material suggestions with review/approve workflow. Results All simulations: paths, radio map, beamforming, channel, … - Panels ▾ — lists every dockable panel with its current dock state; click a row to float it (see section 5).
- The Env select —
Auto (indoor),Indoor, orOutdoor. OnAutothe app infers the environment and applies matching solver presets; the inferred value shows in parentheses. - Two status chips:
- Sionna / Mock only — whether the real ray-tracing backend is installed.
Mock onlyis fine for learning the UI. - Provider name (e.g.
rule_based) / AI off — which AI suggestion provider is active.
- Sionna / Mock only — whether the real ray-tracing backend is installed.
- Actions ▾ (Validate, Compile RF, Beamforming, Export RFData, Delete project…) and the blue Simulate paths button.
3. Visual mode tour
Stay on the Visual tab and look at the left sidebar.
Scene tree
The tree mirrors the scene hierarchy (/buildings/b01/walls, /roads/r01/surface, …). Each mesh row carries a status dot showing its RF-material assignment state, the assigned material id, and an eye toggle (◉/◌) to hide or show it in the viewer. Click a row to select the object; Ctrl-click to multi-select.
Devices section
The Devices header has four buttons:
- +TX / +RX — add a transmitter or a receiver.
- ⤓ JSON — import TX/RX devices from a JSON file (cartesian x/y/z or geographic lat/lon; see point_import.md).
- Clear all — remove every radio device (click twice to confirm).
The Sample Demo ships with tx_001 ("Rooftop TX", red ▲) and rx_001 ("Street RX", blue ●). Each row has a × delete button.
Actors section
Actors are movable scatterers with their own RF geometry. The Actors header adds them with +Car, +Human, +UAV, and +Custom. The demo includes car_001 (a sedan driving down the road) and human_001 (a pedestrian).
Navigating and picking
- Left-drag — orbit around the scene.
- Right-drag — pan.
- Scroll wheel — zoom.
- Click an object — select it (the inspector on the right updates). Clicking a device or actor also shows an X/Y/Z translate gizmo you can drag to move it.
4. The inspector
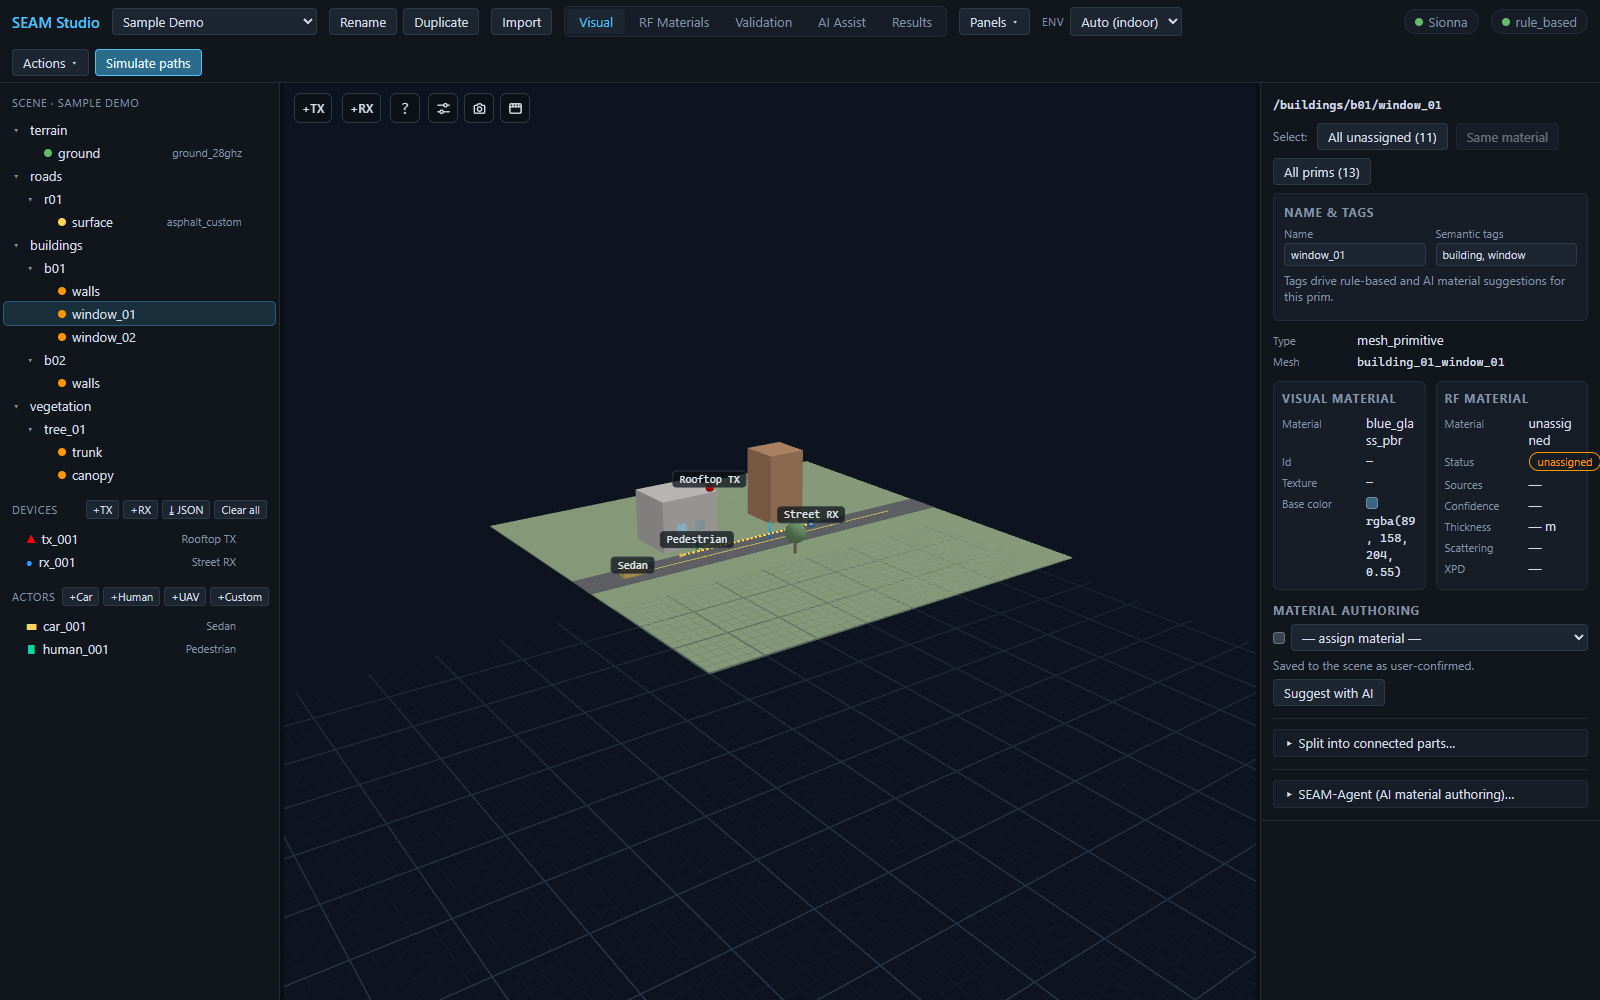
window_01 — semantic tags building, window, visual material blue_glass_pbr, RF material still unassigned.Click the window prim (/buildings/b01/window_01) in the tree or the viewport. The inspector shows, top to bottom:
- Name & tags — the prim's display name and its comma-separated Semantic tags (here
building, window). Tags drive rule-based and AI material suggestions; both fields commit on Enter or blur. - Two side-by-side columns:
- Visual material — what the object looks like: material name/id (
blue_glass_pbr), texture, base color. - RF material — how it behaves electromagnetically: material, assignment status badge (the demo window starts
unassigned), sources, confidence, thickness, scattering, XPD.
This split is the core idea of the app: a blue-glass texture tells you nothing certain about RF penetration loss, so the two bindings are authored and validated separately.
- Visual material — what the object looks like: material name/id (
- Material authoring — one home for every way to fix that:
- a dropdown to assign an RF material directly (saved as user-confirmed),
- Suggest with AI — asks the AI provider for a proposal and jumps to the AI Assist review screen,
- Split into connected parts… — break a merged mesh (e.g. a whole city block exported as one blob) into per-part prims,
- SEAM-Agent (AI material authoring)… — an agent that captures multi-view renders of the mesh, segments it, and proposes an RF material per region with evidence.
Selecting a device instead shows an editable device card (position, power, antenna array, orientation); selecting an actor shows pose, size, RF material, attached devices, and a waypoint trajectory editor.
5. Dockable panels
Result panels (Metrics dashboard, Channel analysis, UE trajectory, Scenario playback, ML dataset) are dockable, photo-editor style. Small buttons on the right of each panel header move it:
- ◧ / ◨ — dock to the left / right sidebar.
- ⧉ — detach as a floating window over the viewport; drag its header to move it, drag edges to resize.
A floated panel survives mode-tab switches — float the Channel analysis panel and it stays visible while you edit the scene in Visual mode. The Panels ▾ toolbar menu reaches every panel from any mode: clicking a row floats it (or focuses it if already floating), and the ◧/◨ buttons next to each row dock it back.
Where to go next
Work through the 15-minute tutorial — it runs the whole loop from material assignment to path simulation, radio maps, and ML dataset export, entirely on the Mock backend if needed.
Related docs
- TUTORIAL.md — 15-minute first session, end to end
- INSTALL.md — full installation guide (Sionna RT, local LLM)
- architecture.md — how frontend, backend, and engines fit together
- scene_format.md — the
.seamproject / scene format - rf_materials.md — the RF material library
- ai_assistant.md — AI material suggestion workflow